
Alerts
-
3 minutes, 18 seconds
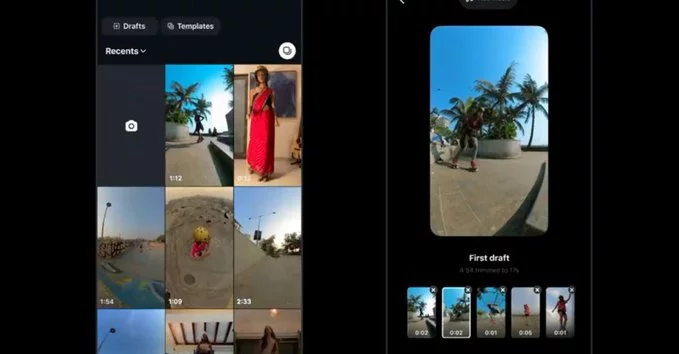
The Auto-Cut Pauses feature is a built-in editing tool designed to streamline the Reels creation process. As its name suggests, the feature automatically detects and removes moments of silence or hesitation within your recorded clips. Instead of manually scrubbing through your timeline to find and trim every awkward gap, this tool analyzes the audio waveform of each segment and identifies pauses that disrupt the video’s pacing.
Once detected, these pauses are cut out seamlessly, pulling the remaining footage together so the action feels tighter and more dynamic. This is particularly useful for talking-head videos, tutorials, or any content where you might naturally pause to think between sentences. The feature works across multiple clips in your Reels project, meaning you don’t have to edit each segment individually. By handling the tedious removal of dead air automatically, it saves you significant editing time while helping you maintain a consistent, energetic rhythm throughout your final video.
Applying the auto-cut pauses feature to your Reels project is a straightforward process that takes only a few taps. First, open your Reels project in the editor and ensure your video clip is selected on the timeline. Next, locate the auto-cut pauses option in the editing toolbar; it is typically represented by a scissors icon with a small clock symbol.
After applying, the pauses are removed cleanly, and your clip’s total duration will update automatically. You can repeat the process on any other clips in your project, or fine-tune individual cuts manually afterwards.
Manually scrubbing through a timeline to remove every awkward silence is tedious and eats into your editing time. The auto-cut pauses feature handles this repetitive task for you, instantly removing dead air across your entire clip. This automation alone can save you significant minutes on every project, allowing you to focus on the creative aspects of your video.
Beyond the time savings, the primary advantage is a smoother, more professional final product. By eliminating long gaps in speech, the pacing of your video becomes tighter and more engaging. Viewers are less likely to lose interest or click away during a long, silent stretch. The result is a polished piece of content that feels deliberate and well-paced, rather than a raw, unedited recording. This simple cleanup dramatically improves the overall listening experience and keeps your audience’s attention where it belongs—on your message.
To get the most out of the auto-cut pauses feature, start by setting the sensitivity level appropriately for your content. For fast-paced dialogue, a lower threshold works best, while a higher threshold suits slow, deliberate speech. Always review the trimmed clips in the preview pane before exporting—the algorithm can occasionally cut a meaningful breath or dramatic pause.
Finally, remember that the feature is designed as a first pass, not a final edit. Export a draft, listen on headphones, and then fine-tune any remaining artifacts. For longer recordings, process in 10-minute segments to avoid performance lag and to make error correction easier. As noted in the official guide, “the best results come from pairing automation with a critical ear.”









Comment